

How To Learn D3 Charting
D3.js is a wonderful JavaScript library which is used for creating interactive and visually appealing graphics. D3.js stands for Data Driven Documents and uses HTML, SVG and CSS to run its magic. From the official docs,
D3.js is a JavaScript library for manipulating documents based on data.D3 helps you lot bring data to life using HTML, SVG and CSS. D3's emphasis on spider web standards gives you the full capabilities of mod browsers without tying yourself to a proprietary framework, combining powerful visualization components and a data-driven approach to DOM manipulation.
This tutorial will exist an introductory tutorial on D3.js where we'll focus on some basic things to create a dynamic graph. Along the course of this tutorial, we'll run into how to create a multi-line nautical chart using the D3.js library.
Looking for a Quick Solution?
If yous're looking for a quick solution, there'southward a selection of JavaScript chart items over on Envato Marketplace.
Starting from just a few dollars, it'south a great way to implement something in a few minutes that would accept a lot longer to build from scratch!
You lot can observe scripts to create everything from simple line charts to complex infographics.


Getting Started
To get started working with D3.js, download and include D3.js, or yous can directly link to the latest version of D3.js.
<script src="http://d3js.org/d3.v3.min.js" charset="utf-viii"></script>
We'll beginning past creating the Ten and Y axes for our chart. We'll use some sample data to plot the chart.
Creating the Axes
Hither is the basic bare-basic HMTL code of index.html:
<html lang="en"> <head> <link href="http://getbootstrap.com/dist/css/bootstrap.min.css" rel="stylesheet"> <link href="http://getbootstrap.com/examples/justified-nav/justified-nav.css" rel="stylesheet"> <script src="http://d3js.org/d3.v3.min.js" charset="utf-viii"></script> </head> <body> <div class="container"> <div class="jumbotron"> </div> </div> </body> </html>
To get started, we'll require some sample data. Here is our sample data :
var information = [{ "auction": "202", "year": "2000" }, { "sale": "215", "yr": "2001" }, { "auction": "179", "year": "2002" }, { "sale": "199", "year": "2003" }, { "auction": "134", "year": "2003" }, { "sale": "176", "year": "2010" }]; Scalable Vector Graphics (SVG) is an XML-based image format for drawing 2nd graphics which has back up for interactivity and animation. We'll employ an svg element to draw our graph. Add the svg element inindex.html:
<svg id="visualisation" width="g" superlative="500"></svg>
Next, allow's define some constants like width, height, left margin, etc., which we'll apply while creating the graph. D3 provides a method chosen d3.select to select an element. We'll utilize d3.select to select the svg element fromalphabetize.html.
var vis = d3.select("#visualisation"), WIDTH = chiliad, Elevation = 500, MARGINS = { meridian: 20, right: xx, bottom: 20, left: 50 }, Based on the data, we need to create scales for the 10 and Y axes. Nosotros'll require the maximum and minimum value of the available information to create the scales on the axes. D3 provides an API method chosen d3.scale.linear which we'll apply to create scales for the axes.
d3.calibration.linear uses ii backdrop called range and domain to create the calibration. Range defines the area available to render the graph, and Domain defines the maximum and minimum values we take to plot in the available space.
xScale = d3.scale.linear().range([MARGINS.left, WIDTH - MARGINS.right]).domain([2000,2010]),
Range has been specified in the above lawmaking so that it doesn't go crowded effectually the edges. Maximum and minimum values for the domain have been set up based on the sample data used.
Similarly, define the yScale every bit shown:
yScale = d3.scale.linear().range([Height - MARGINS.top, MARGINS.bottom]).domain([134,215]),
Adjacent, let's create the axes using the scales defined in the in a higher place code. D3 provides an API method called d3.svg.axis to create axes.
xAxis = d3.svg.centrality() .scale(xScale), yAxis = d3.svg.centrality() .calibration(yScale);
Next, append the created 10 axis to the svg container as shown:
vis.append("svg:g") .call(xAxis); Save the changes and try to browse alphabetize.html. You should have something similar:


As you can see, the X axis is drawn but information technology has some issues. First, nosotros need to position it vertically downwards. While appending the 10 axis to the SVG container, nosotros can utilise the transform property to move the axis down. We'll use translate transform to move the centrality based on coordinates. Since nosotros need to move the X axis only downwards, we'll provide the transform coordinates for the X axis as 0 and the Y axis simply above the margin.
vis.append("svg:g") .attr("transform", "translate(0," + (HEIGHT - MARGINS.bottom) + ")") .call(xAxis); Now, let'southward add the Y Axis. Add together the following code to suspend the Y Axis to the SVG container:
vis.suspend("svg:g") .call(yAxis); Relieve the changes and scan alphabetize.html and you lot should accept both the axes every bit shown.


As y'all can see in the above screen shot, the Y centrality is not in the correct position. So, we need to change the orientation of the above shown Y axis to the left. Once the axis is aligned to the left side, nosotros'll use D3 transform to place it correctly aslope the X centrality. Add together the orient belongings to the yAxis to change its orientation.
yAxis = d3.svg.centrality() .scale(yScale) .orient("left"); Apply D3 transform while trying to suspend the Y centrality to the SVG container:
vis.append("svg:1000") .attr("transform", "translate(" + (MARGINS.left) + ",0)") .call(yAxis); We have kept the y coordinate of translate as 0, since we merely wanted to movement information technology horizontally. Save the changes and browse index.html. You should run across something similar:


Creating the Line
To plot the sample data in our chart, we need to utilize thexScale and theyScale to the coordinates to transform them and to draw a line across the plotting space. D3 provides a API method calledd3.svg.line() to draw a line. So add the following code:
var lineGen = d3.svg.line() .x(function(d) { return xScale(d.year); }) .y(role(d) { return yScale(d.auction); }); Every bit you can see in the above code, we have specified x and y coordinates for the line every bit per the xScale and yScale defined earlier.
Next, nosotros'll append a line path to svg and map the sample information to the plotting space using thelineGen role. Nosotros'll too specify a few attributes for the line such as stroke color, stroke-width, etc., as shown beneath:
vis.append('svg:path') .attr('d', lineGen(data)) .attr('stroke', 'green') .attr('stroke-width', 2) .attr('fill', 'none'); Save the changes and scan alphabetize.html. You should accept the line graph every bit shown:


By default the line will have linear interpolation. We tin can specify the interpolation as well as add together some CSS to the axes to make it look better.
var lineGen = d3.svg.line() .ten(role(d) { return xScale(d.year); }) .y(role(d) { render yScale(d.sale); }) .interpolate("basis"); Add the following CSS to alphabetize.html:
.centrality path { fill: none; stroke: #777; shape-rendering: crispEdges; } .axis text { font-family: Lato; font-size: 13px; } Include the class to both xAxis and yAxis:
vis.append("svg:1000") .attr("form","axis") .attr("transform", "translate(0," + (Acme - MARGINS.bottom) + ")") .phone call(xAxis); vis.append("svg:g") .attr("class","axis") .attr("transform", "interpret(" + (MARGINS.left) + ",0)") .call(yAxis); With basis interpolation and some CSS, here is how information technology should wait:


Creating a Multi-Line Chart
Consider another sample data set equally shown:
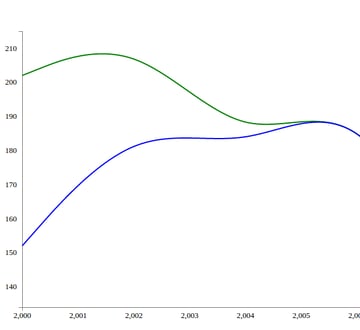
var data2 = [{ "sale": "152", "year": "2000" }, { "sale": "189", "yr": "2002" }, { "sale": "179", "year": "2004" }, { "sale": "199", "yr": "2006" }, { "sale": "134", "twelvemonth": "2008" }, { "auction": "176", "twelvemonth": "2010" }]; For the sake of simplicity, we have considered two dissimilar sample data sets with the aforementioned 10 axis values. In club to plot the above shown data2 aslope data, we simply need to append another svg path to the svg element. The only difference is that the data passed to scale to thelineGen function is data2. Here is how it should expect:
vis.append('svg:path') .attr('d', lineGen(data2)) .attr('stroke', 'blue') .attr('stroke-width', two) .attr('fill', 'none'); Salve the changes and browse index.html. Yous should exist able to run across the multi-line chart as shown:

Determination
In this tutorial, nosotros saw how to become started with creating a unproblematic multi-line chart using D3.js. In the adjacent office of this series, we'll take this tutorial to the next level past making the multi-line chart dynamic, and we'll also add some features to make the graph more than interactive.
Source code from this tutorial is available on GitHub.
Do allow u.s. know your thoughts in the comments below!

Source: https://code.tutsplus.com/tutorials/building-a-multi-line-chart-using-d3js--cms-22935
Posted by: sosakinge1950.blogspot.com
0 Response to "How To Learn D3 Charting"
Post a Comment